The Balanced Ports and Port Groups dialog comprises the functions for balanced port definition. The following examples show how to define and use balanced ports.
 Performing
a balanced measurement
Performing
a balanced measurement
Using
a predefined port configuration
Defining
a new port configuration
The following example shows how to perform S-parameter measurements on a 2-port DUT with balanced input and balanced output using a 4-port network analyzer. You can either use a predefined port configuration with fixed port assignments or define your own port configuration.
To use a predefined port configuration,
Click Trace – Measure – More S-Params... – Balanced Ports and Port Groups....
In the Predefined Configs tab of the Balanced Ports and Port Groups dialog opened, select the port configuration that is suitable for your DUT.

Open the Def Balanced Port tab and assign the appropriate differential and common mode reference impedances to both logical ports.
Connect your DUT to ports 1 to 4 of the network analyzer as shown in the figure above.
Click OK to close the Balanced Ports and Port Groups dialog.
Back in the More S-Parameters dialog, select the balanced S-parameter that you wish to measure.
Click OK to close the More S-Parameters dialog and perform the measurement.
 You can also access all the described settings from the
Measurement
Wizard.
You can also access all the described settings from the
Measurement
Wizard.
To use your own port configuration,
Click Trace – Measure – More S-Params... – Balanced Ports and Port Groups....
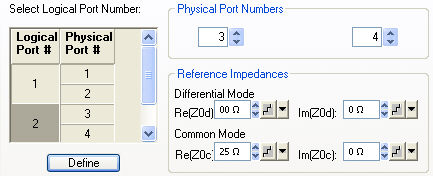
In the Def Balanced Port tab of the Balanced Ports and Port Groups dialog opened, select Logical Port # 1 and assign two Physical Port Numbers, e.g. 1 and 2.
Assign the appropriate differential and common mode reference impedances to logical port no. 1 and Click Define.
Select Logical Port # 2 and assign the two remaining Physical Port Numbers, e.g. 3 and 4.
Assign the appropriate differential and common mode reference impedances to logical port no. 2 and Click Define.
The Def Balanced Port tab shows the balanced port configuration:
Connect one balanced port of your DUT to ports 1 and 2 of the network analyzer, the other balanced port of your DUT to ports 3 and 4 of the network analyzer, in accordance with the selected reference impedances.
Click OK to close the Balanced Ports and Port Groups dialog.
Back in the More S-Parameters dialog, select the balanced S-parameter that you wish to measure.
Click OK to close the More S-Parameters dialog and perform the measurement.
