The S-Parameter Wizard menu consists of a series of dialogs providing the settings for a standard S-parameter measurement in a frequency sweep.
|
|
|
The measurement comprises the following stages:
Choose the single-ended or balanced ports of the analyzer according to the port configuration of your DUT and connect the DUT to the selected analyzer ports. This dialog corresponds to the Predefined Configstab of the Balanced Ports and Port Groups dialog.
 The default test setup corresponds to a standard 2-port
S-parameter measurement. You do not need to select another test setup
unless you want to measure multiport parameters or apply a unbalance-balance
conversion
in order to obtain mixed
mode parameters.
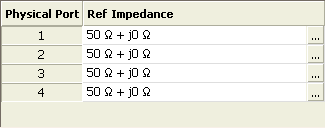
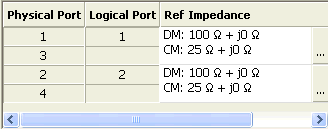
Assign reference impedances to all physical and balanced test ports selected in the previous step. The reference impedances can be complex.
The values for balanced ports are by pressing the  buttons
in a table of the following shape:

The buttons open the Reference Impedance of Physical Portdialog.
The values for balanced ports are by pressing the  buttons
in a table of the following shape:

The buttons open the Reference Impedance of Logical Portdialog.
 The default reference impedance of the physical analyzer
ports is Z0 = 50 Ω. The
default reference impedances for balanced ports are derived hereof. You
do not need to change these value unless you want to renormalize the port
impedances; see Reference
Impedances.
Select the measurement parameters and the diagram areas
Choose an S-parameter or a group of S-parameters to be measured and displayed. The measurement parameters are displayed in separate diagram areas: Cartesian diagram areas are used for transmission S-parameters, Cartesian or Smith diagrams for reflection parameters.
The selections to be made depend on the test setup selected in the previous stage.
 In case of an error in a previous stage, you can always
use the Back button and
correct your settings.
Choose the frequency range and the number of measurement points per sweep. The sweep range is defined by two values (start and stop frequency or center frequency and span). The measurement points are equidistant across the sweep range. Increasing the number of points also increases the measurement time per single sweep.
Select the measurement bandwidth and source power
Choose a typical measurement bandwidth and one of two typical source power values. A smaller measurement bandwidth increases the dynamic range but slows down the measurement. A smaller source power protects the input port of the analyzer from being overdriven if an active DUT with high gain is measured.
 The predefined bandwidths and source powers have been
selected according to the following criteria:
The large measurement bandwidth (Fast Sweep) ensures that the noise of a S21 trace at minimum (–40 dBm) source power and 0 dB attenuation is smaller than 0.1 dB.
The default source power for a passive DUT ensures that the analyzer receiver is in its linear range (no compression) if a passive DUT with 0 dB attenuation is measured. The default source power for an active DUT ensures no compression if an active DUT with 20 dB gain is measured. If the actual gain of the DUT is more than 30 dB, then the default source power of –20 dB is still too high and needs to be changed after finishing the wizard.
Perform a calibration (optional)
Call up the calibration wizard and perform a calibration. The calibration type is a full n-port calibration, where n is the number of analyzer ports selected in the first stage of the calibration wizard. This calibration can be performed as well using automatic calibration (if accessory R&S ZV-Z5x, Calibration Unit, is available).
 You can skip the automatic calibration stage (select Finish now without calibration) if
A valid calibration is already assigned to the active channel
You want to apply a valid calibration stored in the cal pool
You want to perform the calibration manually, e.g. because you wish to select another calibration type.
You don't want to use a calibration, e.g. because the factory calibration is accurate enough for your measurement.
 In order to obtain a predictable result the
measurement wizard has to reset all settings except the current calibration
data. Store your setup if you don't want to lose the current configuration.