Calibration is the process of eliminating systematic, reproducible errors from the measurement results (system error correction). A measurement channel can be calibrated either manually or automatically using the Calibration Unit (accessories R&S ZV-Z51.. -Z55 or R&S ZV-Z58/-Z59):
 Creating
a user-defined calibration kit
Creating
a user-defined calibration kit
TRL
calibration with two lines
TRL
calibration with low-frequency TRM extension
In the following example a 2-port TOSM calibration is performed manually using the Calibration Wizard. Other calibrations can be performed in an analogous way.
Perform all channel settings for your measurement.
Click Channel – Calibration – Start Cal – Two Port P1 P2 – Manual... to open the calibration wizard for the desired calibration type.
In the Select Physical Port Connector(s) dialog, select the connector type that you use at port 1 and 2 (both connector types must be equal) and the calibration kit. Click Next > to access the Measure Standards dialog.
Connect an open standard to port 1 and click the corresponding box in the Measured Standards list to initiate the calibration sweep and acquire the calibration data for this standard.
Repeat the last step for a short and a match connected to port 1, an open, short and match connected to port 2, and for a through between both ports.
Click Apply to start the calculation of the system error correction data, apply them to the current channel and close the calibration wizard.
Replace the last measured standard with your DUT and perform calibrated measurements without changing the channel settings used for calibration.
You can also access manual calibration from the S-Parameter Wizard.
In the following example a 4-port TOSM calibration is performed using the calibration unit (accessories R&S ZV-Z51.. -Z55 or R&S ZV-Z58/-Z59). The calibration of other numbers of ports is analogous; see Performing an Automatic Calibration.
Connect the calibration unit:
Switch on and start-up your network analyzer and establish a USB connection to the calibration unit; see Connecting the calibration unit.
Connect ports 1 the unit to port 1 of the analyzer; repeat this for ports 2 to 4.
Perform the calibration:
Click Channel – Calibration – Start Cal – Four Port P1 P2 P3 P4 – Calibration Unit and wait until the calibration is completed. If a message box All test port connectors will be changed to <Connector type> pops up, confirm with OK.
Remove the connecting cables from the unit, connect your DUT instead and perform calibrated measurements.
You can also access automatic calibration from the S-Parameter Wizard.
Predefined calibration kits do not always contain all necessary calibration standards for a particular calibration type. For advanced calibration types such as TRL with two or more lines, you will have to create your own calibration kit. This is most conveniently done by copying an existing kit and adding new standards. To add a second line standard to a kit containing a single line,
Click Channel – Calibration – Cal Kits... and use the Calibration Kits dialog to select an existing kit.
Click Copy Kit to... and create a copy of the old kit using a new cal kit name.
Select the kit from the Calibration Kits in Use table, click View/Modify Kit, and add the second line standard with appropriate delay time. See TRL calibration with 2 lines below.
Note that the gender combinations (mm, ff or mf) of both lines must be equal.
Suppose you want to perform a TRL calibration using coaxial air lines for the sweep range between 1 GHz and 40 GHz. The through standard has length lthr. The ratio of the stop frequency to the start frequency is 40, therefore an accurate calibration with a single line standard is not possible. However, it is possible to calibrate the entire sweep range with two lines of different (electrical) lengths llong and lshort; see TRL Extensions.
To determine the electrical lengths of the two lines...
Select the length of the longer line such that the transmission phase of (llong – lthr) at the start frequency of 1 GHz is equal to 20 deg: llong = λ (1 GHz) / 18 + lthr = c0 / (18 * 1 GHz) + lthr = 1.666 cm + lthr, where c0 is the velocity of light. This length corresponds to a delay time of Δtlong = 55.55 ps + lthr/c0.
Select the length of the shorter line such that the transmission phase of (lshort – lthr) at the stop frequency of 40 GHz is equal to 160 deg: lshort = 4 * λ (40 GHz) / 9+ lthr = 4* c0 / (9 * 40 GHz)+ lthr = 0.333 cm+ lthr. This length corresponds to a delay time of Δtshort = 11.11 ps + lthr/c0.
To perform the calibration...
Make sure that the two lines are included in a calibration kit, together with the through and the reflect standard required for the TRL calibration. See Creating a user-defined calibration kit.
Still in the Calibration Kits dialog, click Export Kit... to save your settings to a cal kit file.
Close the Calibration Kits dialog.
Click Channel – Calibration – Start Cal – Two Port P1 P2 – TRL... to open the calibration wizard (see also Manual calibration).
In the Physical VNA Test Port Connector(s) dialog, select your Connector type and Calibration Kit. Click Next >.
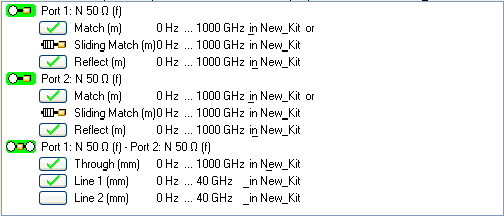
In the Measured Standards dialog opened, perform the calibration sweeps for all standards including the two displayed lines Line 1 and Line 2.

Click Apply to start the calculation of the system error correction data, apply them to the current channel and close the calibration wizard.
Replace the last measured standard with your DUT and perform calibrated measurements without changing the channel settings used for calibration.
Suppose you want to perform a TRL calibration using coaxial air lines for the sweep range between 300 MHz and 4 GHz using a line standard with an electrical length of llong = 16.6666 cm and a through standard of lthr. << llong. TRL calibration is known to become inaccurate in the frequency range below fTRM = c0/(18*llong) = 1 GHz; see TRL Extensions. It is therefore advisable to perform a combined TRL/TRM calibration using an additional match or sliding match standard.
Make sure that the calibration kit contains a match or sliding match standard, in addition to the line, the through and the reflect standards required for the TRL calibration. If necessary generate a cal kit file as described in section TRL calibration with 2 lines.
Click Channel – Calibration – Start Cal – Two Port P1 P2 – TRL... to open the calibration wizard (see also Manual calibration).
In the Physical VNA Test Port Connector(s) dialog, select your Connector type and Calibration Kit. Click Next >.
In the Measured Standards dialog opened, perform the calibration sweeps for the match (or sliding match) and the reflect standard at all ports. In addition, perform the calibration sweeps for the through and the line (Line 1) between any combination of ports.
Click Apply to start the calculation of the system error correction data, apply them to the current channel and close the calibration wizard.
Replace the last measured standard with your DUT and perform calibrated measurements without changing the channel settings used for calibration.